
Si buscas
hosting web,
dominios web,
correos empresariales o
crear páginas web gratis,
ingresa a
PaginaMX
Por otro lado, si buscas crear códigos qr online ingresa al Creador de Códigos QR más potente que existe


HOW TO REPROGRAM AN ECU WITH A CONSULT 3 PLUS
26 Dec 20 - 02:21
This is a Nissan Consult 3 Plus confirmed to work for ECU reprogramming,This article show a guide on how to use Nissan Consult 3 Plus to reprogram Engine Control Module(ECM) or Transmission Control Module (TCM).
Note:A symptom based TSB isrequired before using this procedure.This procedure does not apply to Nissan LEAF™.
Preparation:
Nissan Consult 3 Plus All Version Free Download
Nissan Consult 3 Plus Interface
IMPORTANT: Before starting, make sure:
* ASIST on the CONSULT PC has been freshly synchronized (updated).
* All C-III plus software updates (if any) have been installed.
NOTE: The CONSULT PC automatically gets applicable ECM and TCM reprogramming data during ASIST synchronization.
* A screen print for Warranty documentation can be done from the CONSULT PC during this process while still connected to the vehicle.
* No DTCs stored.
o Use C-III plus to perform Self Diagnosis for all systems.
o If there are any DTCs other than those listed in the accompanying Symptom based TSB, diagnose, perform repairs, and erase DTCs before continuing.
For conventional and hybrid vehicles; if reprogramming the ECM, take the vehicle for a 10 minute drive in order to meet the following conditions:
Hybrid only: Li-ion battery charging status: 50% or more
Engine coolant temperature: 70 – 100°C (158 – 212°F)
Battery voltage: More than 12.9V (At idle)
Transmission: Warmed up
NOTE:
* After reprogramming is complete, you will be required to perform Throttle Valve Closed Position, Idle Air Volume Learn (IAVL), Accelerator Closed Position, and DTC erase.
* The abve conditions are required for the IAVL to complete.
ECU TCM Reprogram Guide:
1.Connect the plus Vehicle Interface (plus VI) to the vehicle.
Make sure to use the correct VI for C-III plus (plus VI).
CAUTION: Make sure the plus VI is securly connected. If the plus VI connection is loose during reprogramming, the process will be interrupted and the ECM/TCM may be damaged.
2.Connect the AC Adapter to the CONSULT PC.
CAUTION: Be sure to connect the AC Adapter. If the CONSULT PC battery voltage drops during reprogramming, the process will be interrupted and the ECM/TCM may be damaged.
3.Connect a battery charger to the vehicle battery:
For Conventional Vehicles
Set the battery charger at a low charge rate.
NOTE: The GR-8 (Battery and Electrical Diagnostic Station) set to “Power Supply” mode is recommended.
CAUTION: Be sure the battery charger is connected securely to the battery. Make sure the battery voltage stays between 12.0V and 15.5V during reprogramming. If the battery voltage goes out of this range during reprogramming, the ECM/TCM may be damaged.
For Hybrid Vehicles
* Use the GR-8 –Battery and Electrical Diagnostic Station.
CAUTION : DO NOT use a standard battery charger for Hybrid vehicles. Make sure to connect the GR-8 securely to the 12V battery. Make sure the battery voltage stays between 12.0V and 15.5V during reprogramming. If the battery voltage goes out of this range
4.Turn off all external Bluetooth® devices (e.g., cell phones, printers, etc.) within range of the CONSULT PC and the VI.
CAUTION: Make sure to turn off all external Bluetooth® devices. If Bluetooth® signal waves are within range of the CONSULT PC and the VI during reprogramming, reprogramming may be interrupted and the ECM/TCM may be damaged.
5.Turn the ignition ON with the engine OFF or “not ready”.
The engine must not start or run during the reprogramming procedure.
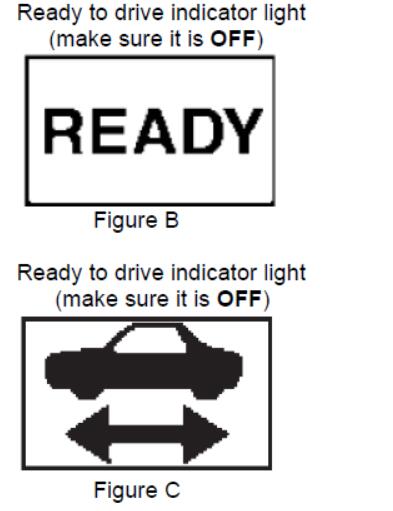
For Hybrid vehicles, make sure the dash warning lights are ON and:
The “READY” light is OFF (not illuminated). OR The ready to drive indicator light is OFF (not illuminated).
6.Turn OFF all vehicle electrical loads such as exterior lights, interior lights, HVAC, blower, rear defogger, audio, NAVI, seat heater, steering wheel heater, etc.
IMPORTANT: Make sure to turn OFF all vehicle electrical loads. Make sure the battery voltage stays between 12.0V and 15.5V during reprogramming. If the battery voltage goes out of this range during reprogramming, the ECM/TCM may be damaged.
7.Turn ON the CONSULT PC.
8.Select CONSULT-III plus (open C-III plus).9.
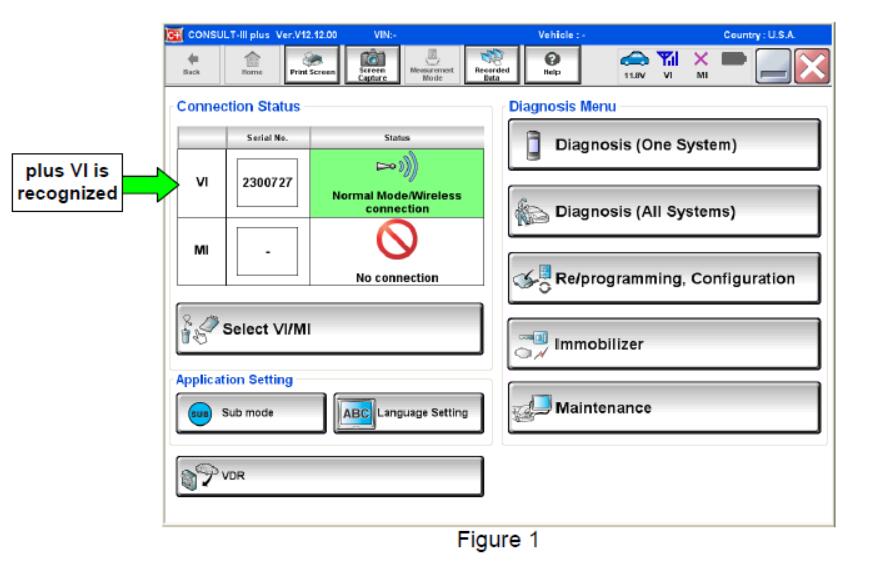
9.Wait for the plus VI to be recognized / connected.
* Serial number will display when the plus VI is recognized / connected.
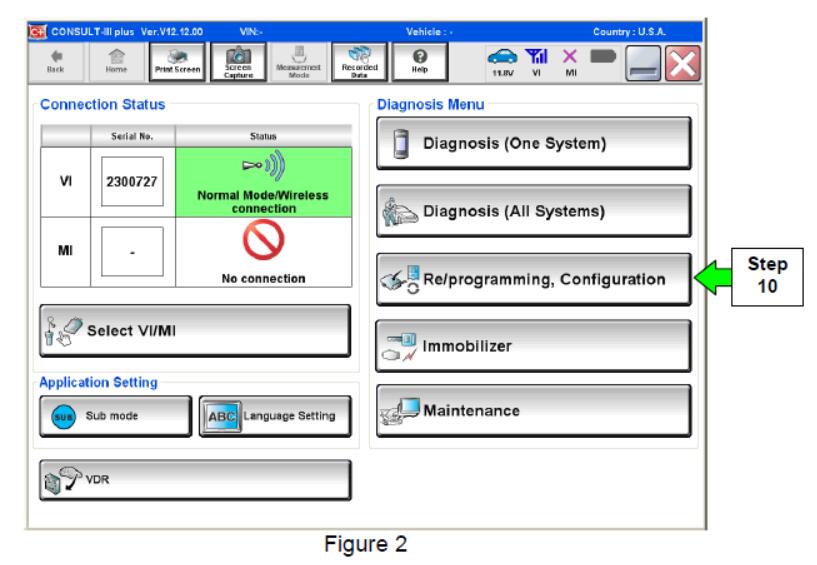
10.Select Re/programming, Configuration.
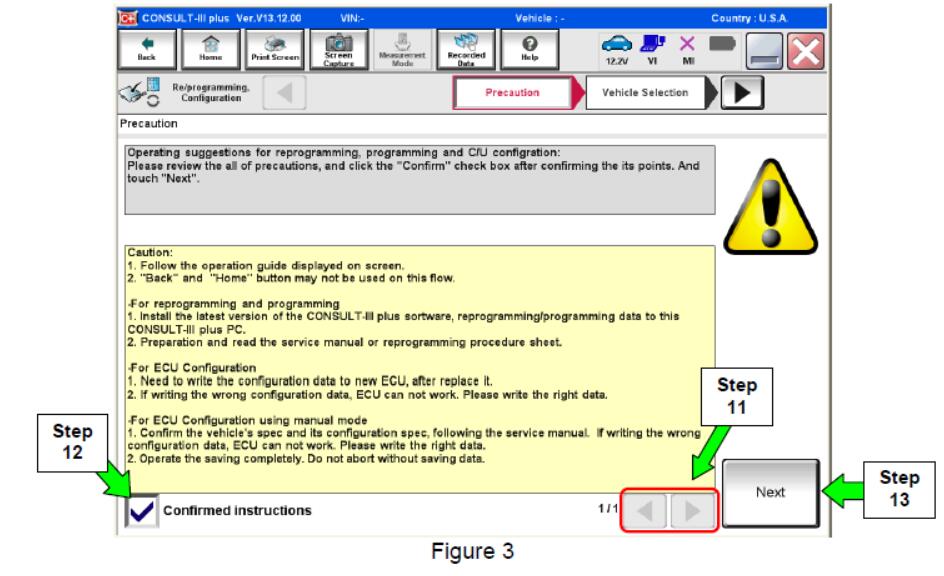
11.Use arrows (if needed) to view and read all precautions.
12.Check the box confirming the precautions have been read.
13.Select Next.
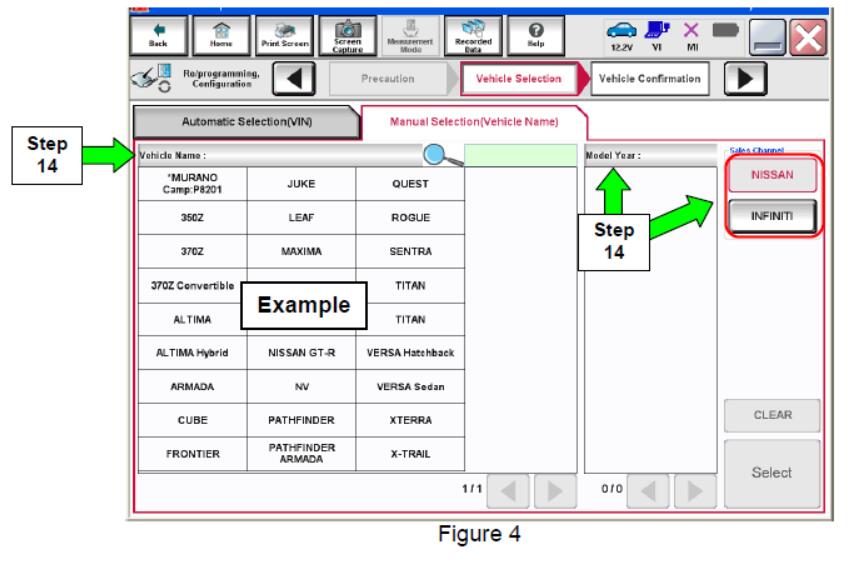
14.Select Nissan or Infiniti, Vehicle Name, and then the correct Model Year.
If the screen in Figure 4 does not display, skip to step 15.
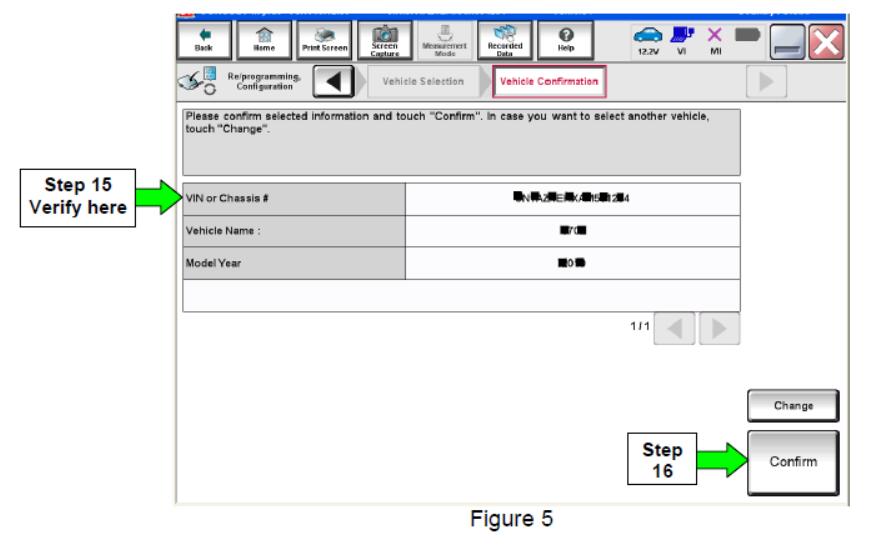
15.Make sure VIN or Chassis # matches the vehicle’s VIN.
16.If the correct VIN is displayed, select Confirm.
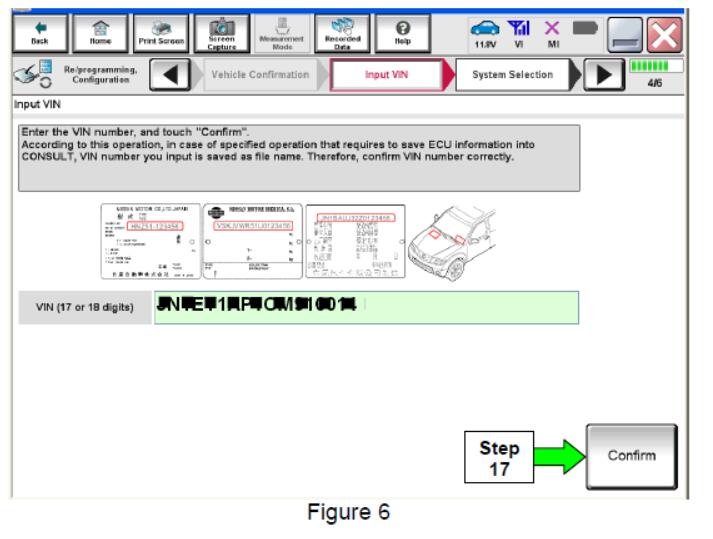
17.Select Confirm.
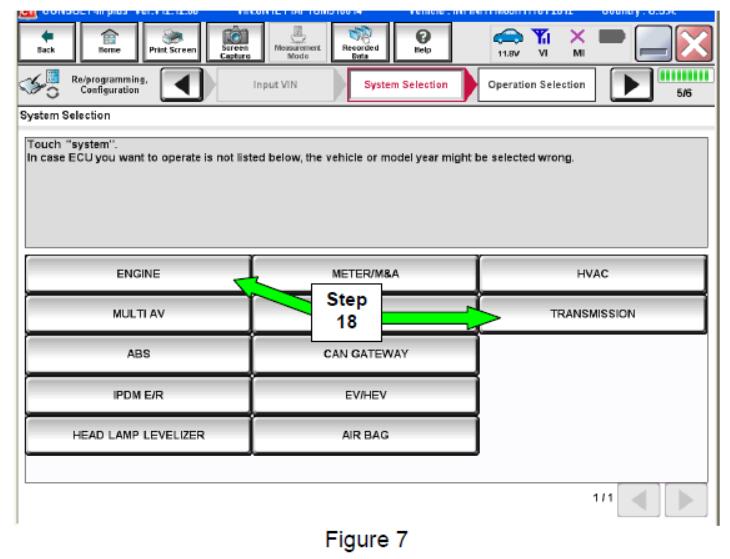
18.Select ENGINE or TRANSMISSION.
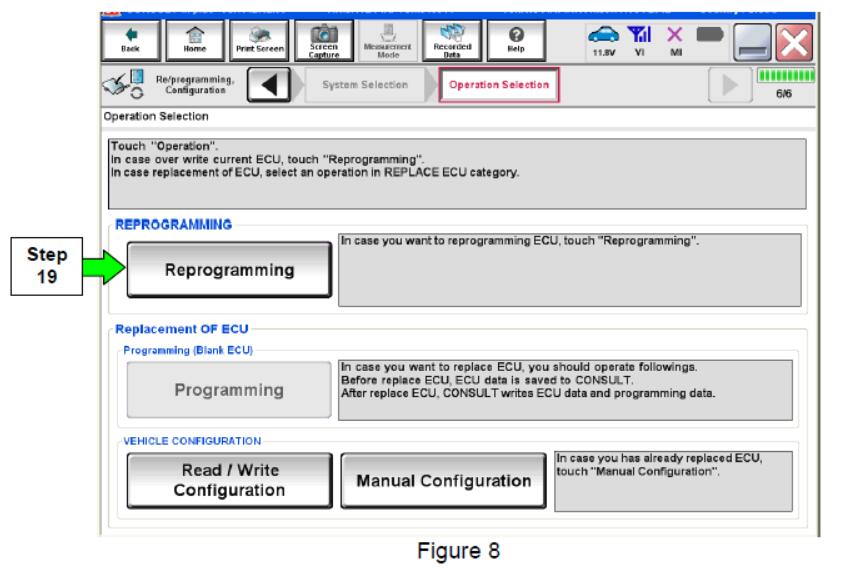
19.Select Reprogramming.
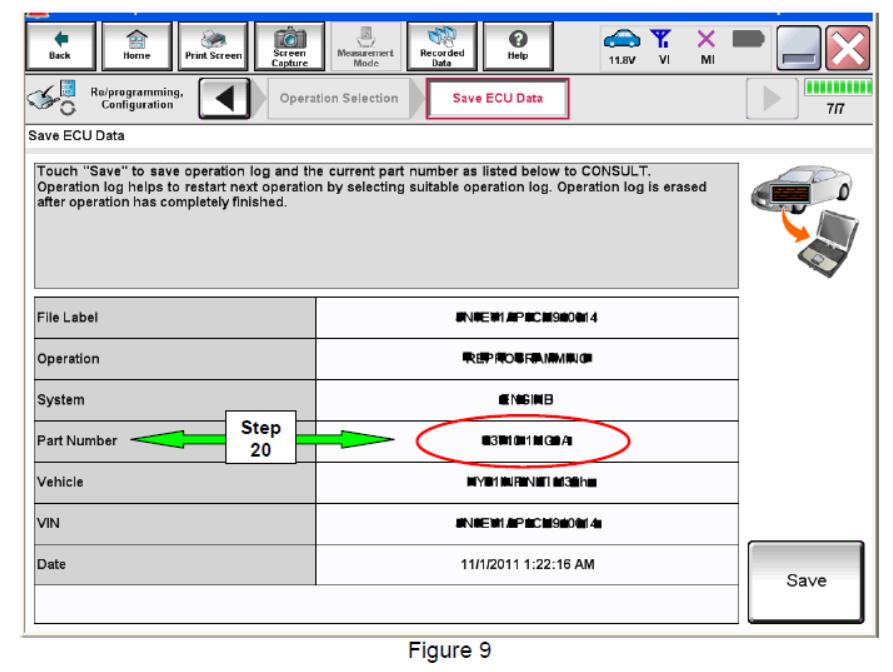
20.Find the ECM OR TCM Part Number (see Figure 9) and write it on the repair order.
NOTE: This is the current Part Number (P/N).
21.Refer to the symptom based TSB that directed you to reprogram the ECM or TCM.
The symptom based TSB is required in order to determine if reprogramming applies to the vehicle you are working on.
If the symptom based TSB indicates that reprogramming applies, continue with the procedure.
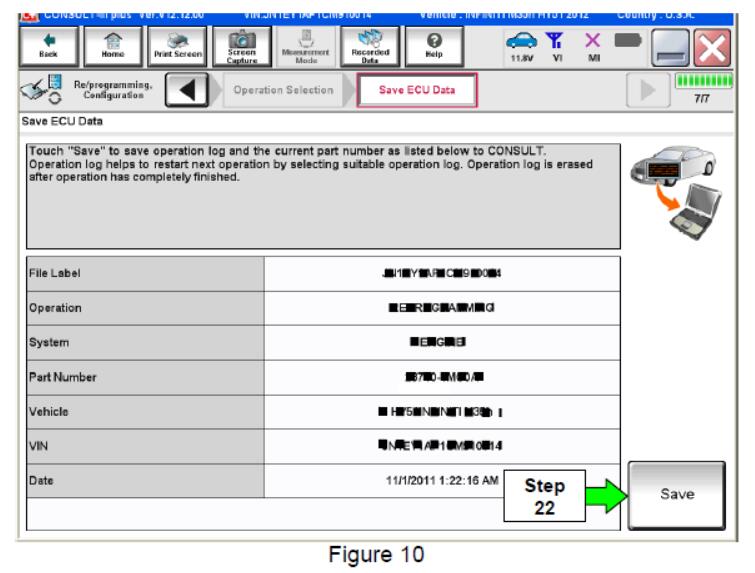
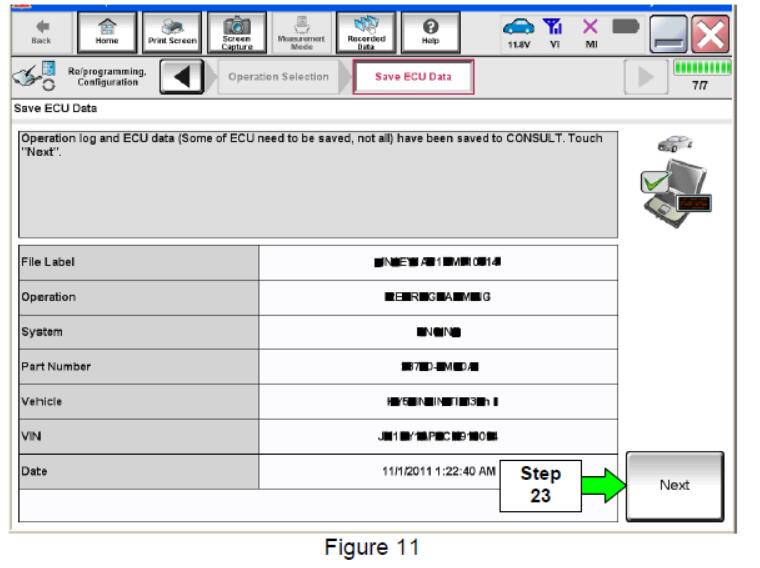
22.Select Save.
23.Select Next.
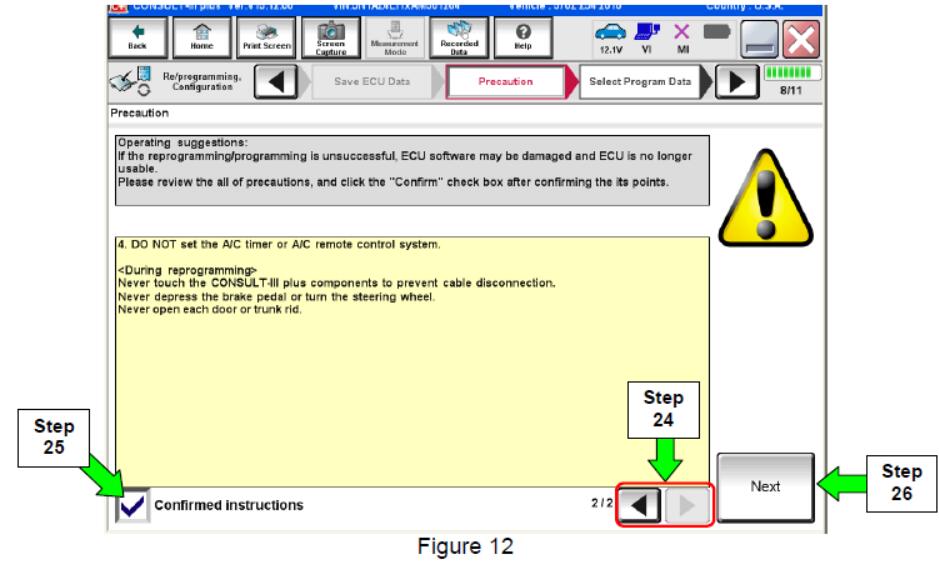
24.Use arrows (if needed) to view and read all precautions.
25.Check the box confirming the precautions have been read.
26.Select Next.
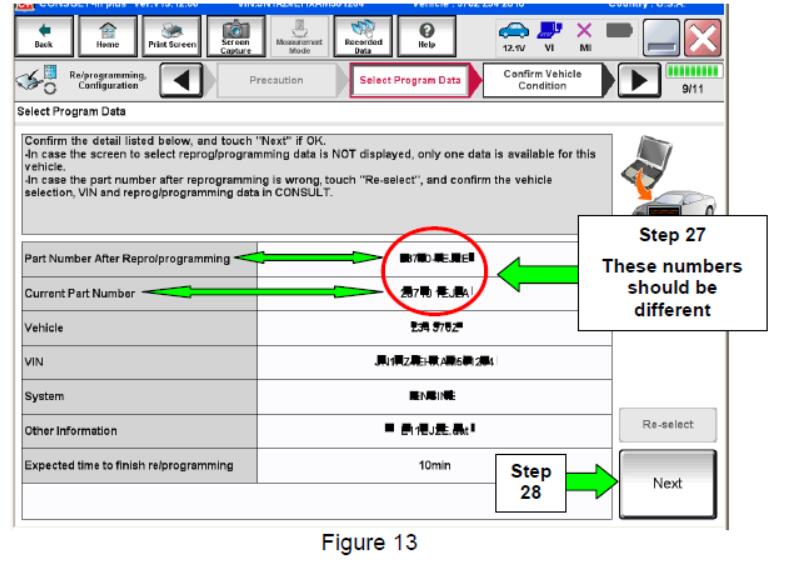
27.Read the Current Part Number and Part Number After Reprogramming. They should be different.
28.Select Next.
NOTE:
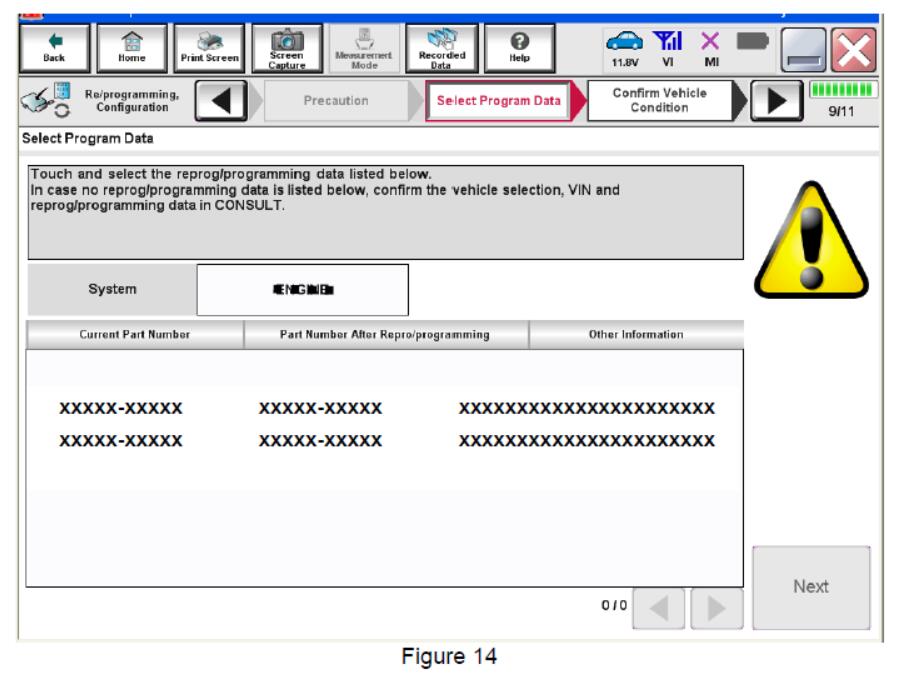
In some cases, more than one new part number for reprogramming is available.
If there is more than one new P/N, the screen in Figure 14 displays.
Use the symptom based TSB to choose the correct reprogramming.
* If you get this screen and it is blank (no reprogramming listed), it means there is no ECM/TCM reprogramming available for this vehicle.
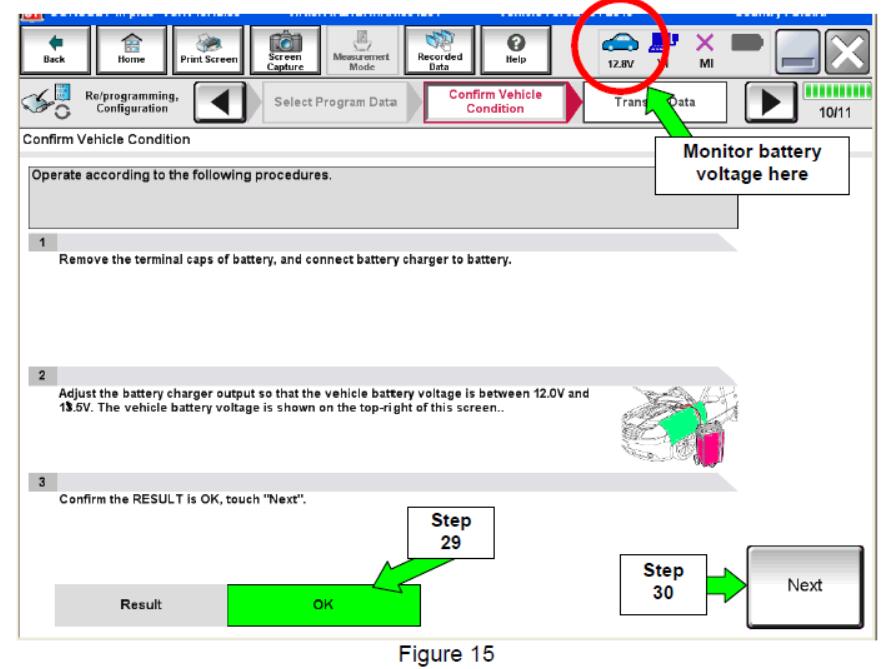
29.Make sure OK is highlighted green (battery voltage must be between 12.0 and 15.5 Volts).
30.Select Next.
IMPORTANT: Battery voltage must stay between 12.0 and 15.5 Volts during reprogramming or ECM reprogramming may be interrupted and ECM may be damaged.
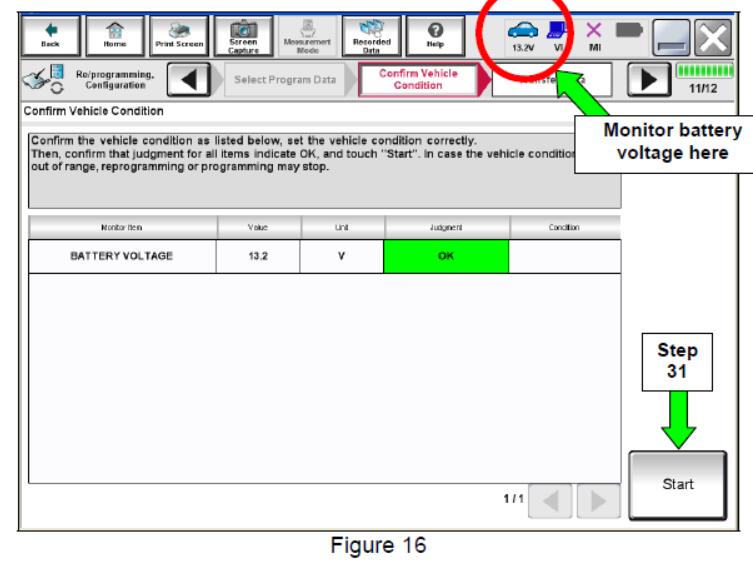
NOTE: In the next step, the reprogramming process will begin when Start is selected.
31.Select Start.
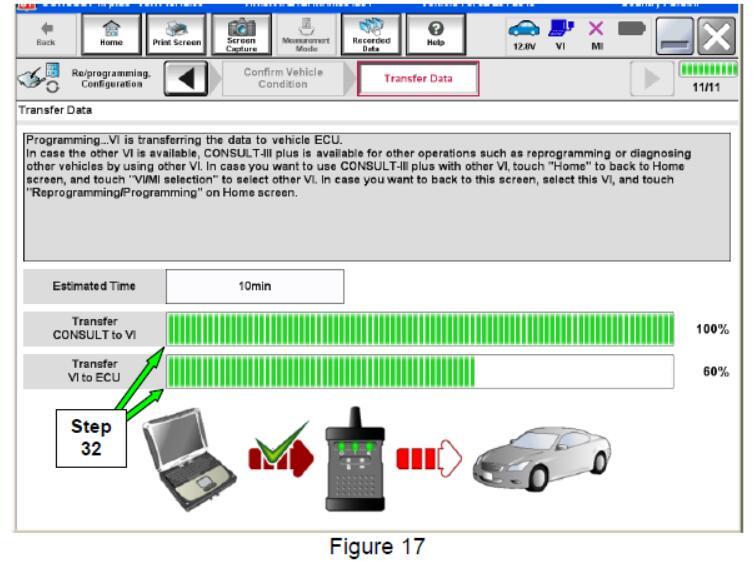
32.Wait for both progress bars to complete.
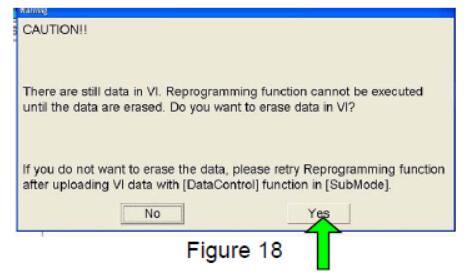
NOTE: If the message shown in Figure 18 appears, there is data stored in the plus VI. Select “Yes” to proceed with reprogramming.
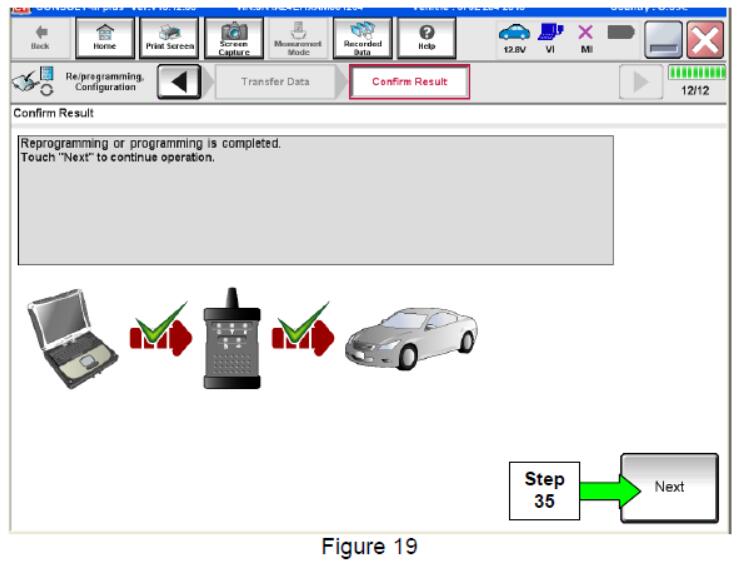
33.When the screen in Figure 19 displays, the reprogramming is complete.
NOTE: If the screen in Figure 19 does not display (reprogramming does not complete), refer to the information on the next page.
34.Disconnect the battery charger from the vehicle.
35.Select Next.
NOTE:Additional steps/operations are required before C-III plus will provide the final reprogramming confirmation report.
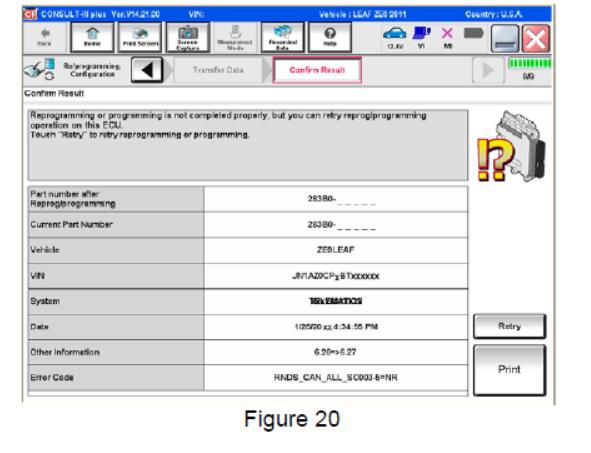
If reprogramming does not complete and the “!?” symbol displays as shown in Figure 20:
* Check battery voltage (12.0 –15.5V).
* Ignition is ON, Ready Mode is OFF.
* External Bluetooth® devices are OFF.
* All electrical loads are OFF.
* Select Retry and follow the on screen instructions.
NOTE: Retry may not go through on first attempt and can be selected more than once.
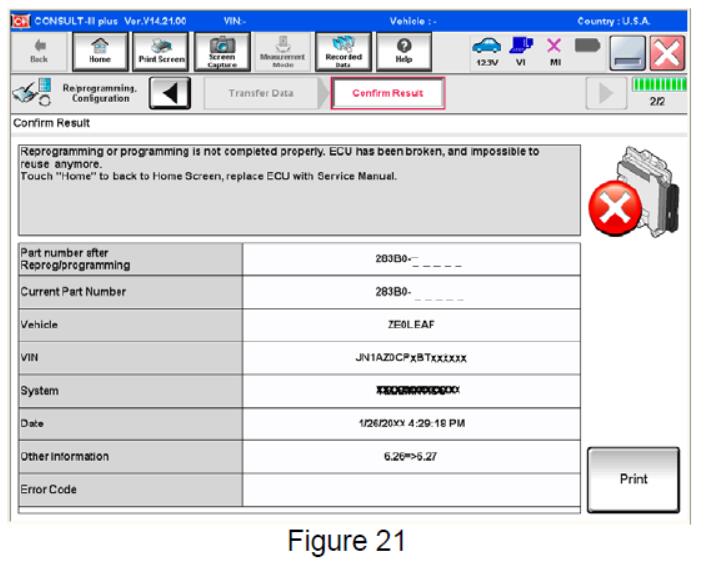
If reprogramming does not complete and the “X” symbol displays as shown in Figure 21:
* Do not disconnect the plus VI or shut down C-III plus if reprogramming does not complete.
* Check battery voltage (12.0 –15.5V).
* CONSULT A/C adapter is plugged in.
* Ignition is ON, Ready Mode is OFF.
* Transmission in Park.
* All C-III plus / plus VI cables are securely connected.
* All C-III plus updates are installed.
* Select Home, and then restart the reprogram procedure from the beginning.
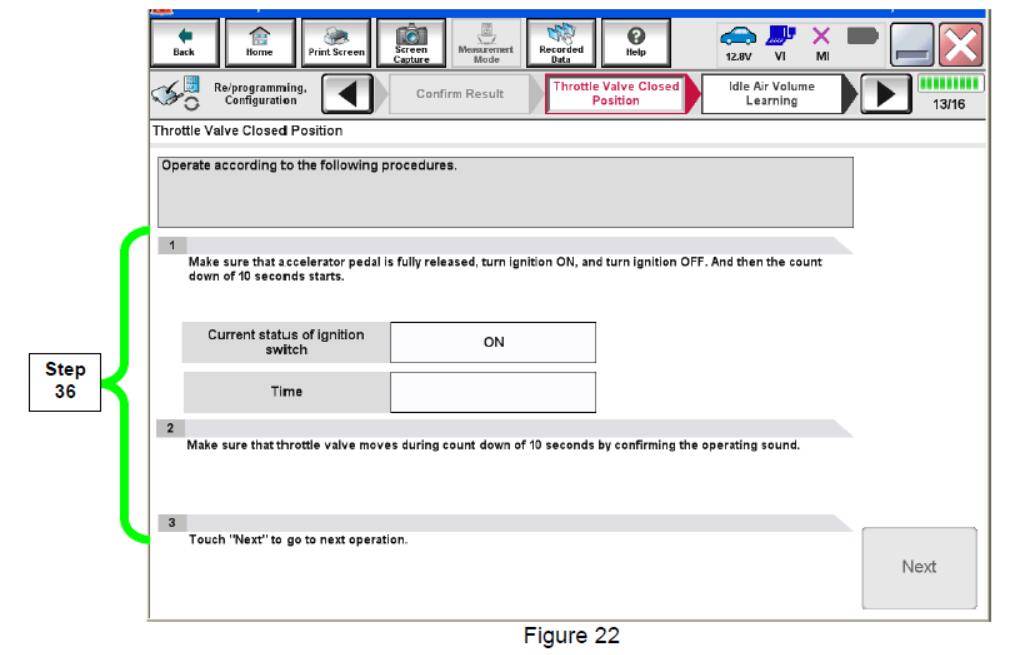
36.For ECM reprogramming: Perform Throttle Valve Closed Position procedure.
* Follow the on-screen instructions (1, 2, and 3) to complete the procedure.
37.For ECM reprogramming: Perform Idle Air Volume Learn (IAVL).
a.Turn the ignition ON (engine running or “ready to drive”position).
* For conventional vehicles, start the engine and let it idle.
* For Hybrid vehicles; make sure the “ready”or “ready to drive”indicator light is ON (illuminated). The engine will start automatically as needed.
b.Select Next.
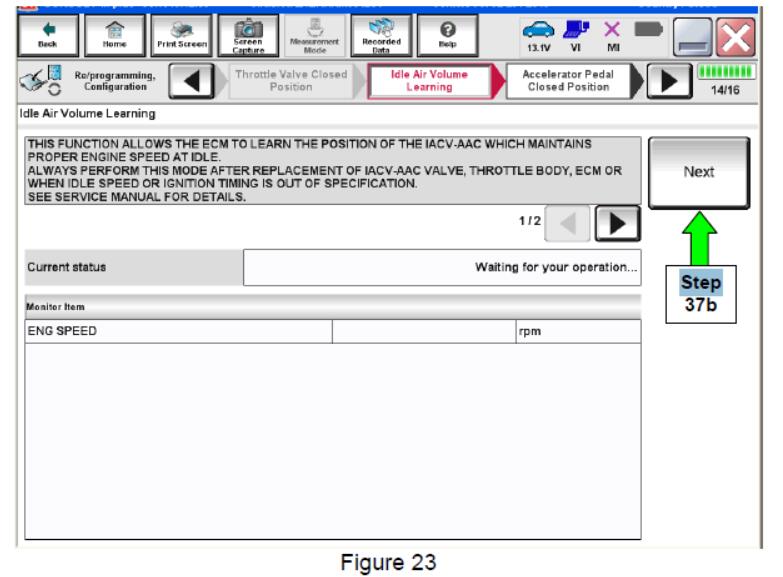
c.Select Start.
b.Wait for IAVL to complete.
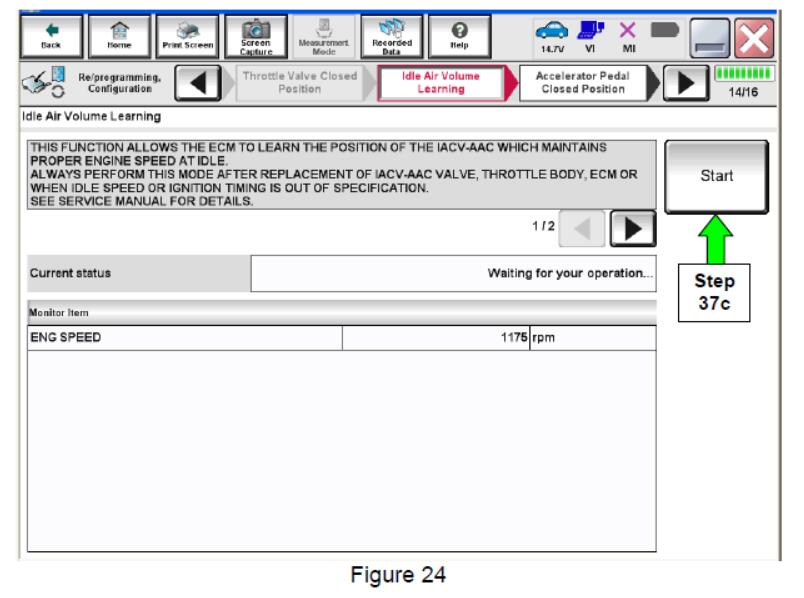
NOTE:
* Listed below are common required conditions for IAVL to complete.
* If IAVL does not complete within a few minutes, a condition may be out of range.
* Refer to the appropriate Electronic Service Manual (ESM) for specific conditions required for the vehicle you are working on.
–>Hybrid only – Li-ion battery charging status: 50% or more
–>Engine coolant temperature: 70 – 100° C (158 – 212°F)
–>Battery voltage: More than 12.9V (At idle)
–>Selector lever: P or N
–>Electric load switch: OFF (Air conditioner, headlamp, rear window defogger)
–>teering wheel: Neutral (Straight-ahead position)
–>Vehicle speed: Stopped
–>Transmission: Warmed up
e.Select Next.
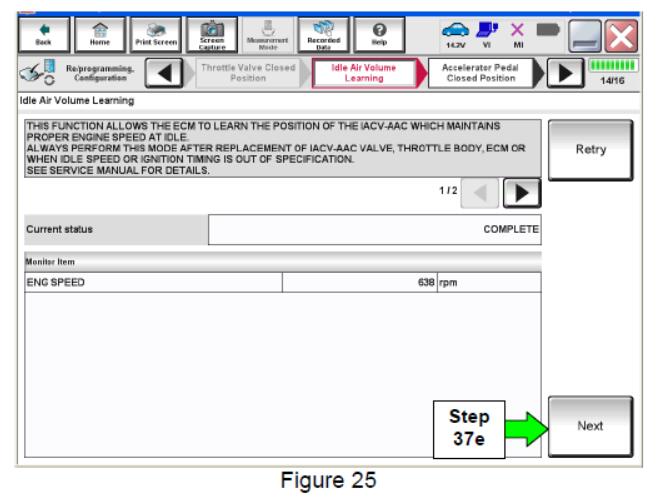
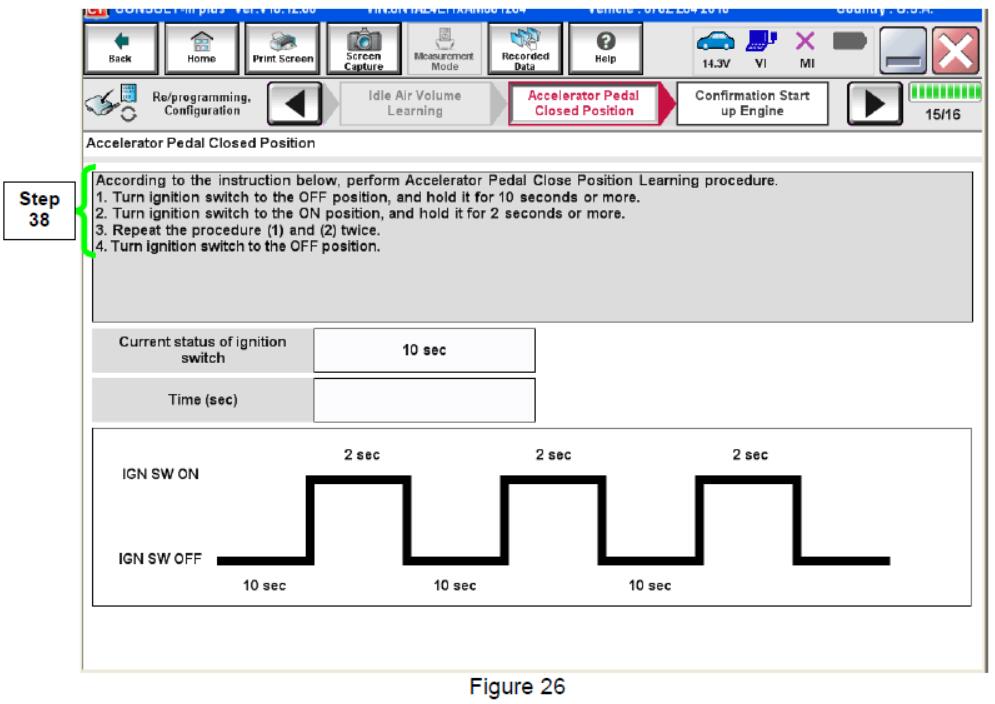
38.For ECM reprogramming: Follow the on screen instructions to complete Accelerator Pedal Close Position Learning.
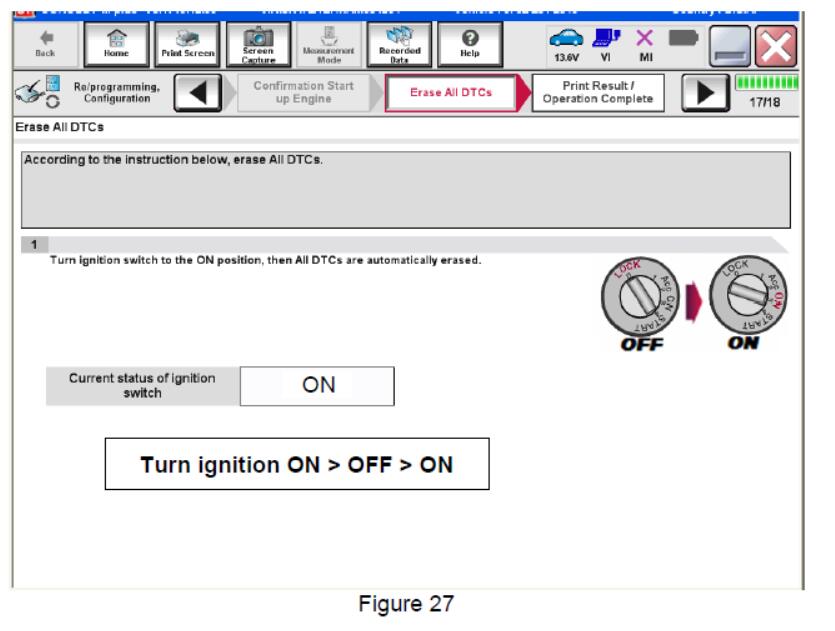
39.Erase all DTCs as follows:
a.Turn the ignition OFF
b.Turn the Ignition ON.
c.Wait for DTC erase to complete.
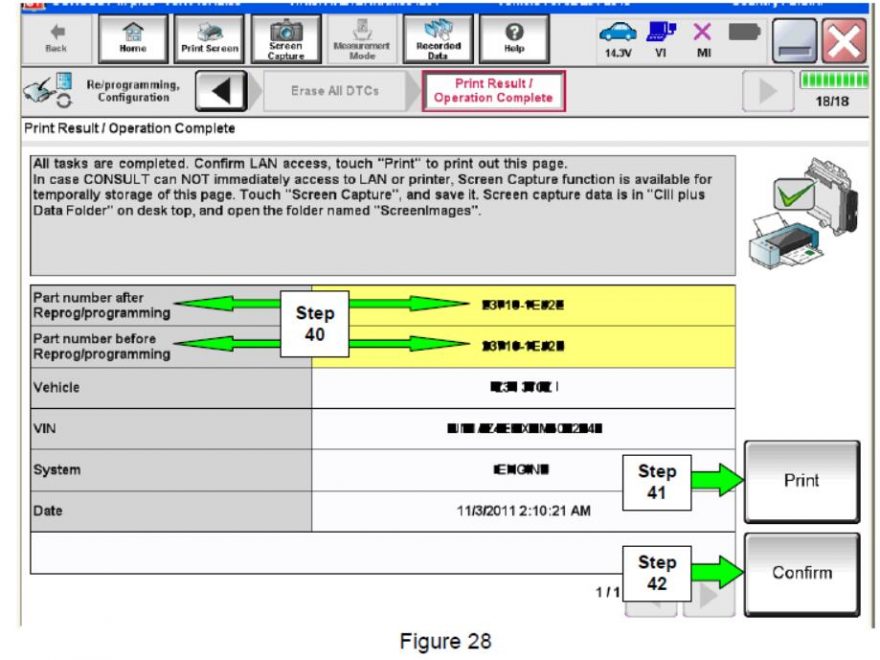
40.Verify the before and after part numbers are different.
41.Print a copy of this screen (Figure 28) and attach it to the repair order.
42.Select Confirm.
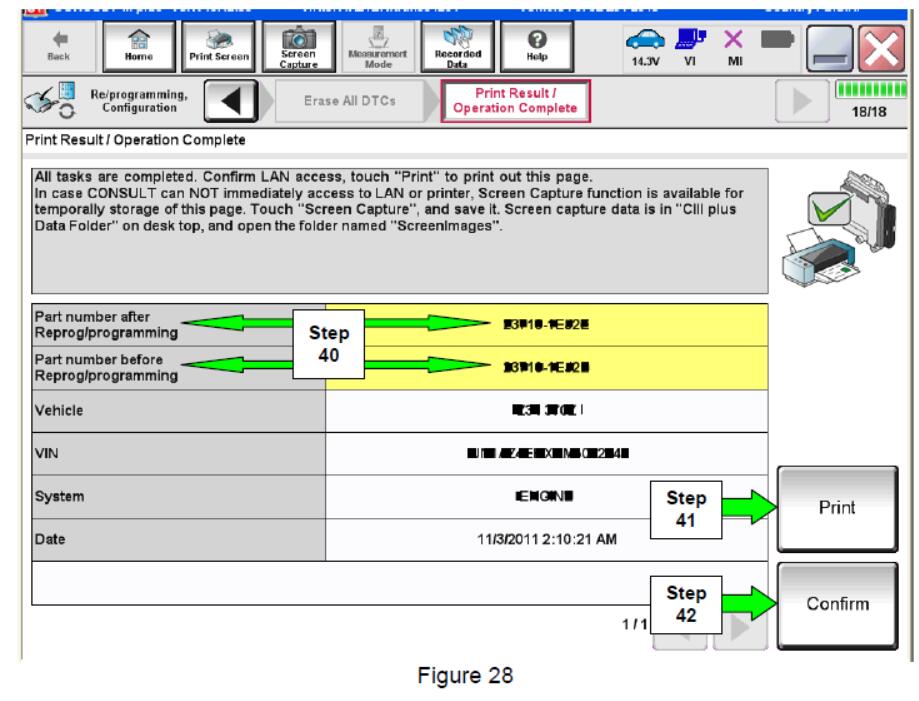
NOTE: If you cannot print the above screen:
a.Select Screen Capture.
b.Name the file.
c.Save the file in My Documents.
* A copy of the screen is now saved in the CONSULT PC. It can be retrieved and printed at a later time.
43.Close C-III plus.
44.Turn the ignition OFF.
45.Disconnect the plus VI from the vehicle.
44753
Add a comment